| |
|
Note
from Joch:
DMD regular enemies have about
20% less health than their Normal/Hard mode
counterparts – this presumably is to compensate
for the massive offense and/or defense boost
they get when they DT. Most of the time you
won’t notice the difference, but in certain
cases you might. |
| |
 |
| |
|
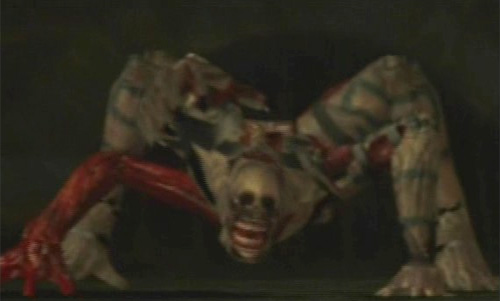
Marionettes
& Bloody Mari
They are low-class evil spirits that
borrow the bodies of puppets in order
to exist in a physical state. The Bloody
Mari's red outfit dyed with human blood
somehow increases their evil powers.
|
 |
 |
 |
First
appearance: Mission 1
Joch's strategy:
At the beginning of the game,
you will only have Force Edge and E&I
to take on these puppets. Use either the
4-Hit combo with High Time finisher
or the Multi-Stab combo. Use
High Time to knock Maris up into
the air, and Stinger or the last
thrust of a Multi-Stab combo
to knock them down – this makes
them defenseless, leaving them open to
comboing. When concentrating on a single
Mari, don’t ignore the others –
evade with a jump/roll if you
hear the telltale twirling sound
of projectiles about to be thrown. Get
rid of the shotgun Maris first, as they
are the most dangerous. Later on, the
puppets go down almost ridiculously easily
to grenade gun shots, Air Raid, Vortex,
Meteors, Infernoes – you get the
idea.
As per Marionettes. Due to their superior
blocking abilities, however, you may need
to High Time them more frequently
than the other Marionettes in order to
overcome their parries. If you hold down
R1 whilst slashing a blocking Bloody Mari,
it will enable you to slash again more
quickly, thus avoiding being hit on the
counterattack.
|
|
| |
|
Sin
Scissors
They are low-class evil spirits that
can only exist by taking a shape of physical
objects. These evil spirits have chosen
a deadly scissors as their shape. These
evil spirits are dependent on the masks
they wear. They cannot exist without them.
|
 |
 |
 |
First
appearance: Mission 2
Joch's strategy:
Use DTed downward slashes, doing
wall-jumps to gain greater height. The
shotgun also works reasonably well: just
keep blasting away to stun, and eventually
kill, the Sin Scissors. The most effective
method, though, is a critical hit. Slash
once (in non-DT mode) at the Sin’s
open pair of scissors to send it into
a stunned pose, then quickly run forwards,
swivel left,
and take a single shot with E&I, the
shotgun, or (later on) even the grenade
gun. If done correctly, a few small red
orbs will instantly appear, before the
body disintegrates and the bulk of the
red orbs appears. It’s well worth
trying to master this method of killing
Sin Scissors – also, you can’t
complete Secret Mission 1 without it.
|
|
| |
|
Sin
Scythe
These evil spirits are dependent on the
masks they wear. They have scythes instead
of scissors. Like the Sin Scissors, they
are dependent on their masks. They cannot
exist without them.
|
 |
 |
 |
First
appearance: Mission 8
Joch's strategy:
Use Air Raid or the
shotgun. The Sin Scythes go down ridiculously
easy to both. You can get critical hits
against them in the same way as you can
against Sin Scissors, but their scythes
are far harder to deflect close-up than
the scissors – it isn’t worth
going to the effort of killing Sin Scythes
with critical hits, when they are so easy
to kill by other means. Watch out for
their irritating scythe throws –
the Sins’ sycthes are quite hard
to evade.
|
|
| |
|
Death
Scissors
The part that looks like a cow’s
bone is their main body. Their evil is
much stronger and tougher when compared
to the Sin’s. They use many staffs
made from bones of animals and humans
to create an evil barrier. This barrier
is impenetrable. You must defeat the enemy
within it.
|
 |
 |
 |
First
appearance: Mission 6
Joch's strategy:
The best method of dealing with
the Death Scissors – DTed Air-Hiked
slashes on its head – probably won’t
be available to you this early on. An
effective substitute is to stand in front
of the Death Scissors, jump straight up,
kick-jump off its head, and do a DTed
downward slash. You can also do wall-jumps,
but the Death Scissors has a frustrating
habit of blocking nearly every single
wall-jumped slash – so you will
need to be persistent and patient. If
you have Ifrit, then Infernoes
are also excellent against the Death Scissors
– and you can DT-cancel them to
gain back DT! Just input the command for
an Inferno, then immediately press
L1 to cancel – the Inferno will
still come out, but in non-DT mode. If
done correctly, you will refill your DT
gauge. Finally, it is almost impossible
to kill the Death Scissors without it
going into corkscrew dive mode at least
once. Its skull will turn bright pink,
it will become invulnerable to all of
your attacks (so don’t attack it
– it’s better to taunt for
DT or wait during this period), and then
finally rise up out of sight and do 4-5
corkscrew dives in a row. As the Death
Scissors approaches, it will make a distinctive
“whooshing” sound –
when you hear that sound, evade.
You can either run a couple of steps then
jump away from the Death Scissors,
or you can target it by holding R1 and
do a roll to the side as it approaches.
Wait for the Death Scissors to fully recover
first before attacking it again after
the corkscrew dives are over.
Although I don’t recommend items
in general, a single Holy Water will
kill a Death Scissors in one fell swoop.
|
|
| |
|
Death
Scythe
These are the evilest, the strong strongest,
and the highest ranking of all the “Sins”.
|
 |
 |
 |
First
appearance: Mission 11
Joch's strategy:
Use DTed Air-Hiked slashes
against the Death Scythe – wait
until it swoops down and raises its scythe
to take a swipe at you, then Air Hike
straight up and do a downward slash on
its head. The Death Scythe will quite
often swoop down several times in a row,
leading to a very quick demise –
however, it does have a rarer attack where
it does a long, gliding swoop along the
ground, trying to skewer you like a kebab.
If it does that type of swoop,
then your Air-Hiked slash will miss the
Death Scythe - but at least you won’t
get hit. Another method is to Inferno
the Death Scythe’s scythes which
are embedded in the ground – press
L1 to DT-cancel the Infernoes (refer to
Death Scissors section), and gain several
DT runes back with each Inferno. Not only
can you maintain a permanently full gauge,
but Infernoing the Death Scythe’s
scythes will kill the Death Scythe itself
surprisingly quickly – try it.
The Death Scythe will lay annoying whirlpool
traps all over the area. Try to avoid
stepping in one of those altogether, but
if you do get caught up in one, just keep
on jumping forwards in the air until it’s
over – the Death Scythe’s
swipes will miss you.
|
|
| |
|
Shadow
It has evil spells covering its body,
thus allowing it to deflect all sword
attacks. It’s an evil spirit that
takes form from its own shadows. But they
can also take on other forms by changing
the spells on its body.
|
 |
 |
 |
First
appearance: Mission 4
Joch's strategy:
Fire (preferably DTed) E&I
or shotgun bullets at the Shadow until
it exposes its core – do not
try to slash it during this time,
as you will trigger its almost-impossible-to-evade
white/purple needles. Shooting at the
Shadow will enrage it, so be prepared
to run/jump/roll a lot to avoid
its many grab attempts. If it sends spikes
coming out of the ground, run round in
circles without doubling back on yourself
to evade. Its spinning throw attack is
deadly accurate – when you see the
Shadow rise up into the air out of sight,
run and then jump to evade its spinning
lunge! Once the core is exposed, use 2-3
DTed Stingers to turn the Shadow
red. If you have Ifrit, Kick-13s
are also very powerful against the core.
As soon as the Shadow has turned red,
you can either squeeze in a double-handed
taunt first or just run for your life.
Air Hike helps enormously in
evading a red Shadow. Alternatively, jump
over the Shadow
as it lunges at you – this may sound
like leaping into the lion’s jaws,
but it actually works much better than
trying to jump away
rom a lunging Shadow. Finally, you can
jump and fire E&I to suspend yourself
in mid-air, letting the Shadow’s
lunge pass harmlessly by.
It’s possible to turn the Shadow
red without ever exposing its core –
this is what’s known as the “critical
hit.” To achieve this, you must
not shoot at the Shadow –
you need to calm it down to the point
where it will only do its two long-range
attacks: the horizontal spike or the spinning
throw. Instead, walk around at mid-distance
from the Shadow, waiting for it to stop
and its face to start dissolving –
once it does so, quickly get in front
of the Shadow and jump straight up –
if your timing was right, you will land
on the horizontal spike the Shadow shoots
out. On the spike, stand still and fire
E&I for all you’re worth! (DTing
isn’t a necessity.) If enough bullets
go in, the Shadow will turn red then and
there – evade, as described above.
The achievability of a critical hit depends
on what mode you are in: on Normal mode,
you can turn nearly every Shadow red in
one go; on Hard mode, you will sometimes
have to stand on the spike several times
to turn a Shadow red; on DMD mode, the
critical hit simply isn’t available
at all – but you can still stand
on the spike and fire E&I to greatly
weaken the health of the Shadow. Critical
hits are also a very good method of fighting
multiple Shadows, since it calms them
down and makes it a much less frantic
encounter overall.
|
|
| |
|
Beezelbub
This evil spirit inhibits the body of
a fly. Their hideousness is not too difficult
to imagine from its appearance and movements.
|
 |
 |
 |
First
appearance: Mission 6
Joch's strategy:
Pah. Go to town with either Air
Raid or the shotgun. Easy.
|
|
| |
|
Kyklops
Although they appear similar to the Phantom,
they are still one of the low-class evil
spirits. However, since they take on earth
and rocks as host elements, they have
substantial durability. Contrary to their
appearance, they have superb leaping abilities.
|
 |
|
 |
First
appearance: Mission 10
Joch's strategy:
Two words: Air Raid!
On Normal mode, Kyklops are very susceptible
to Air Raid; once one Kyklop has been
finished off, drop back down and run around
until your DT refills, then Air Raid the
second Kyklop. On Hard/DMD modes, Kyklops
can still be Air Raided, but they have
about twice the resistance to it –
nevertheless, they’ll still go down
with 9-10 runes of DT. An alternative
to Air Raid is DTed Air-Hiked slashes
on the centre of the Kyklop’s bulb
– this will do absolutely massive
damage, since it is their weak spot. Kyklops
can also damage each other, by hitting
each other with the rock-spewing attack.
As you’ll know, though, if you do
Secret Mission 5, this is a slooow way
of killing a Kyklop.
|
|
| |
|
Blade
They are soldiers created by the Dark
Emperor to take control of the surface.
They use a kind of reptile as host bodies,
thus having much lizard like characteristics.
|
 |
 |
 |
First
appearance: Mission 9
Joch's strategy:
Use grenade-rolling (i.e. cancel
the lag of the grenade shot with a roll
to shoot again much more quickly), or,
better still, a combination of grenade-rolling
and Vortex Lvl 2, to tear through
packs of Blades. Nothing is more powerful
against them, particularly when you reach
the Blades in the well in Mission 11!
(This is even more true of Hard/DMD modes,
where you get far more Blades in the well.)
The Nightmare Beta is a nice weapon to
use against Blades when you get it –
just keep rolling and shooting to rack
up easy Stylish combo ratings.
Blades’ weak spot is their back
– if you hit this, it’s a
one-hit kill, no matter how much health
or armour they have. To set up the critical
hit, you need to put them belly-side down.
With the shotgun, shoot the Blade point
blank in the face to stun it, then quickly
run around behind it and shoot it in the
back – this will send it tumbling
through the air to land on its stomach.
Quickly jump forwards and slash downwards
(no need to be in DT mode). If your hit
connected, the Blade will spurt out lots
more blood than normal =P Stinger
will work in the same way as the shotgun.
You can use the grenade gun, but don’t
shoot the Blade in the face first –
instead, get right behind it
and shoot it in the back – this
will often send it flying to land belly-side
down. Again, jump and slash downwards.
You can use Ifrit’s flame-kick to
get the critical hit, too, but it tends
to go askew.
For the underwater Blades, you can only
use the Needlegun against them. Get at
mid-range distance from a single Blade,
and maintain a steady, rhythmic firing
pattern against it until it dies. If it
starts to swim too close to you, press
R1 + analogue stick back + Triangle to
swim away backwards from it. The only
attack underwater Blades have is shooting
blood from their claws, which your needlegun
fire can deflect – so just keep
on shooting continuously.
|
|
| |
|
Sargasso
They hide between the edges of the sea
and the Underworld. They wait on stray
wanderers and feast on them. The spirits
of the victims are destined to wander
the endless sea of the Underworld. |
 |
|
 |
First
appearance: Mission 3
Joch's strategy:
Use two shotgun shots each against
a single Sargasso. (Or one shotgun shot
against a DMD Sargasso!) The grenade gun
works brilliantly at taking out several
Sargassoes in one go, if you have it –
just trigger the Sargassoes into following
you, then fire at them. Otherwise, normal
Alastor combos will suffice – 4-Hit
combos with rising High Times
followed by a downward slash, that kind
of thing. Sargassoes don’t actually
have much health, and even the large ones
pose little real threat.
|
|
| |
|
Nobody
Their level of intelligence is low. Hence
their kind wasn’t given a name.
But their skill to survive is a force
to be reckoned with. After all, they have
survived this extreme world of survival
of the fittest.
|
 |
 |
 |
First
appearance: Mission 19
Joch's strategy:
Inferno them, and then finish
off with grenade-rolling. They are a pain
to kill any other way; although repeated
DTed Stingers up their rear ends
work quite well. In general, though, the
size, jerky movements, and the explosive
large eye which they lay down make the
large Nobodies, at least, very difficult
to melée effectively. Shotgun blasts
will stun both the small and large Nobodies
– it takes a while, but shotgun-twitching
will finish them off. Also, be wary of
the Nobodies’ infernal dance –
it will drain your DT rapidly. When a
Nobody dies, keep away from the spattering
remains.
|
|
| |
|
Fetish
Although they appear similar to the Marionettes,
they have much greater evil powers. They
are not the works of a man, but they appear
to have been created by an evil entity.
|
 |
 |
 |
First
appearance: Mission 9
Joch's strategy:
To deal with a single Fetish,
I recommend comboing it from the back,
as it can’t block a single hit that
way – just knock it up in the air
with a High Time or Magma
Drive, then run round behind it.
If you are comboing it from the front
and it raises up its shurikens to block
you, do a quick roll to the side, as it
will counterattack with its fiery
breath. To deal with groups of Fetishes
(these are more commonly found on Hard/DMD
modes), grenade-rolling combined with
Vortex Lvl 2 lays them to absolute
waste. Uncharged Meteors also
work nicely in taking out groups of Fetishes,
but be careful not to get hit by an attack
from offscreen. On DMD mode, try not to
let a group of Fetishes DT, but if they
do, then use Vortex Lvl 2 or
charged Meteor Lvl 2s against
them – the grenade gun will earn
DT back in a hurry.
|
|
| |
|
Frost
They are soldiers created by the Dark
Emperor to take control of the surface.
Enveloped in cold air, they are the elites
of their kind. Their quickness is a definite
advantage in cornering their prey. The
cold honed claws are none other than an
ice blade. The air around the blades is
beyond absolute zero temperature and the
victims who are slashed will die without
feeling any pain.
|
 |
 |
 |
First
appearance: Mission 9
Joch's strategy:
Inferno. Oh, you want
more? =P Well, two Infernoes will normally
kill a pair of Frosts, if you catch both
of them full-on in the blasts. A fully-charged
Meteor Lvl 2 will greatly weaken
a Normal/Hard Frost, and outright kill
a DMD Frost. Not only that, but if you
line up two Frosts, you can hit both of
them for full damage with a single Meteor.
(Lining up two Frosts is possible in Mission
7 (Hard/DMD mode) and Mission 17 (all
modes) – for Mission 7, run a few
steps to the right after entering; for
Mission 17, get in front of the Frost
furthest away from the door. Start charging
up a Meteor, and one of the Frosts should
hop back to join its mate ;p) To kill
a single Frost, do an Inferno followed
by an Auto-Combo (you can DT-cancel the
AC to gain back some DT). Alternatively,
just wail upon it with non-DTed Kick-13s,
punches, and Magma Drives –
Frosts are so weak to Ifrit, it will soon
go down XD … Don’t
use the sword, though. Not unless you
like a challenge!
Note: In
Mission 17, one of the Frosts will always
do a cheap lunge immediately after the
cutscene. To evade it, cancel the cutscene;
and then, while the screen is still black,
hold R1 + analogue stick back and jam
on the Triangle button. Depending on the
force of your jump you’ll either
end up in between the Frosts or in front
of both of them, but you won't have been
hit.
|
|
| |
|
Plasma
They are electrical evil spirits transformed
into the shape of bats.
|
 |
 |
 |
First
appearance: Mission 16
Joch's strategy:
The quickest way to kill a group
of Plasmas is with an Inferno
blast – that will kill them off
in one fell swoop, but be careful not
to land too near a human Plasma, as it
can take a counterattack swipe at you
as the Inferno comes out. An uncharged
Meteor will kill a human or bat
Plasma instantly, so feel free to fire
off uncharged Meteors from a distance.
Human Plasmas are very prone
to creating copies of themselves upon
death – however, you will never
get more than three Plasmas in a group,
so fortunately their ability to make copies
is restricted. Bat Plasmas are generally
easier to deal with – use grenade-rolling,
Roundtrips, or uncharged Meteors
to kill them. Bat Plasmas also only have
two attacks – a vertical beam and
a curved blade – both of which can
be evaded with a jump/roll to the side.
Finally, DTed shotgun shots work quite
nicely against Plasmas – just keep
blasting away, using the shotgun-twitching
technique if possible.
|
|
| |
|
Credits:
Thanks to Joch
for the almighty strategies and Krizy
for screencapturing the pictures for me!
|
|
|