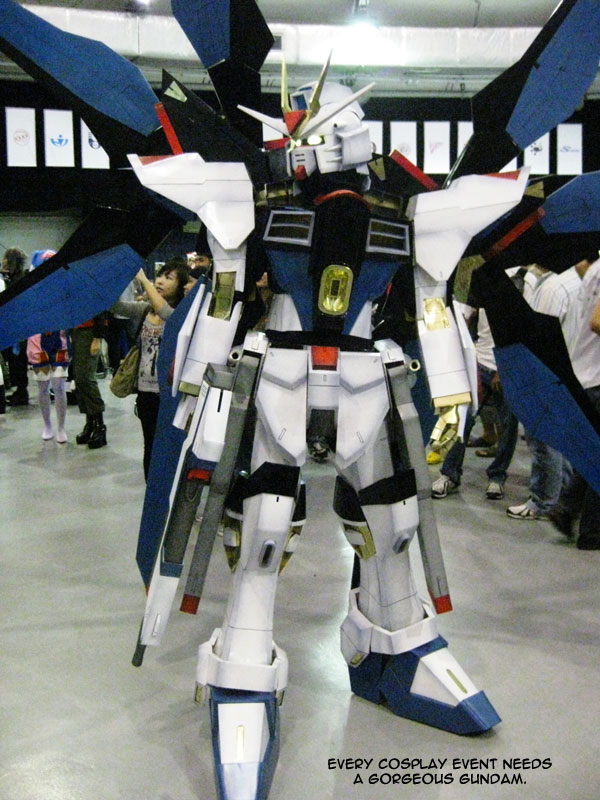
This year's Cosfest is pretty fun even tho' I first thought it'd suck cos' my new shoes were torturing me badly and I couldn't really walk around to enjoy the cosplay and take photos. Luckily it got better when I forced myself to walk and look around in the hopes of finding cosplay worth taking pictures of. There weren't many that were WOW, but at least there are a number of pretty decent ones.
Personally, I was wearing a punk outfit that I've had for over 6 months yet never once worn. I got my pants for free using the $200 voucher that I won from last year's best dress competition thingy, and the top's from eBay. =P The nasty shoes are from the local ladies' shoe store Charles & Keith. x_X I still remember that I'm actually supposed to wear lolita and meet up with that Travis Touchdown cosplayer I met last year during EOY, but alas... we didn't contact each other for this event as originally planned. Then again, I dunno how I'd be able to survive the heat if I were to wear lolita. I was already complaining about the heat even with my loose outfit.
As for what went on on stage, the two most memorable 'shows' that I (bothered to) remember is a karaoke performance by an Indian lady, and a song/dance by a Louis Armstrong cosplayer (Full Metal Alchemist). The Indian lady (apparently nicknamed Mizuki) is the winner of the karaoke competition and really has an impressive singing voice, along with very good Japanese pronunciation. How envious... >_<! Sadly, I didn't remember/think to record a video of that but..... at least I recorded the other performance by Louis Armstrong! This one's almost priceless. Dude can't sing and looks odd up close, but even then he still managed to win the solo cosplay competition. Watch the vid below to find out why and how. =D
In case you're wondering what Y.A.O.I. stands for in his song, it's Young Alchemist Omph! Institution. XD
11th July 2009, Saturday
Resident Evil 5: The Mercenaries (Part 4) - The Bosses
Yes, I'm still very much addicted. Here's my detailed post on the bosses of each stage, though I'm missing my ultra hardcore technical chart for something very handy that I'm still working on. I still need more time to work on it, so I'll post it the next time I'm ready.
Executioner (Stage 1 - Public Assembly)
Attacks:
Axe slam:
His main attack. He typically does it once he gets within 4 feet and can be dodged by 1) side stepping 2) backing away 3) turning around and run 4) running past his side. The first three methods require that you do them very soon, so I recommend method #4. However, method #4 could possibly make him cancel his axe slam to go for his grab move instead (see below).
Grab:
He tends to do this when you stand very close to him. To avoid, either back off or run away (emphasis on away). Running towards his back and thinking that he'd miss you does not work; he'd auto-redirect himself to grab you just as all other enemies in this game do. If he grabs you, wiggle the left analog as fast as possible to shake him off. If that fails, prepare for the prompt to dodge his axe after he throws you onto the ground. (It's either [] or X) By the way, the game does not allow mashing of both buttons. x_X Good news, however, is if you happen to be grabbed by an enemy when he tries to grab you, you will be released of the enemy's grab immediately.
Axe swing:
He does this pretty randomly but mostly when he's a bit of a distance away. The only way to avoid getting hit by this is to stay out of his range. Be warned that he also tends to do this immediately after recovering from a full stun or double melee (with partner), so be sure to run away before he recovers. One bonus point about this attack is that he helps you kill all enemies in range for you. >:3
Helpful tactics:
The Executioner usually requires a couple of strong shots before he's stunned, but sometimes even a weak handgun like BSAA Chris's could stun him in 2~4 shots, especially if shot in the head. If he falls over on one knee, run up to his face and blast several more of your strongest gun until he tries to get up, and then melee him in the last second before the prompt disappears. If he slumps his back at you after the melee, it means his immediate next move would be the axe swing.
He takes 10% more damage if you shoot him in the head, but unless you're a really sharp shooter or you play on the PC with a keyboard/mouse, I recommend just shooting him in his chest, although that also means getting in more shots before he's stunned. Fortunately, there are other faster ways to stun him - 1) hand/flame/flash grenades 2) shoot at a red barrel/electric generator/dynamite held by enemies nearby.
Reaper (Stage 2 - The Mines)
Attacks:
Grab/Impale: Dude's grab is an instant kill (along with a 2-mile reach and lock-on system). Even without a survey we know this is what makes the Reaper the most feared enemy in RE5. The only way to avoid this attack is to turn around seriously fast and RUN. Backing up does not help cause they move too fast.Note, however, that there's one way to temporarily disable it from doing this move, which is to blow off its middle arms with a couple of shots. Problem is, they grow back the next second. D:<
Claw: You'd be lucky if it decides to do this instead of the grab. Of course, if you blew off its middle arms this would be the only attack it can do until it regrows them. Fortunately for us, this attack does little damage.
Mist:
It sort of automatically releases this 'mist' once shot. This mist clouds its appearance and makes it harder for you to tell where the little weak spots on its back are. If you manage to hit those spots (or its exposed belly), it'll kneel over exposing its shoulders' weak spots and the mist will disappear. The mist itself does no damage.
Helpful tactics:
The Reapers are damn dangerous opponents and should always be dealt with from a distance unless stunned. Thankfully, though almighty as it is, all it takes is one single bullet (of any kind) to hit the weak spot(s) on its back for it to reveal its shoulders. When the shoulders are revealed, all it takes is yet another single bullet at each shoulder for it to reveal its biggest weak spot that is the belly, which is why the machine guns may be the easiest to deal with them.
Better yet, characters with grenade launchers (STARS Chris & Tribal Sheva) can easily instant-stun it with either an electric, acid or flash round. (Note that flash grenades do not work!) STARS Chris starts out with 12 electric rounds so he's pretty much insured, but Tribal Sheva would have to pray for enemies to drop those rounds first. If you have luck and a good aim, though, Tribal Sheva can still kill the Reapers in a single hit by aiming straight for its belly which it randomly exposes sometimes while closing in on you. (There's a good probability that it'll expose it just a split second before grabbing you) That's also how both Weskers can kill them with a single magnum or Hydra (shotgun) ammo. However, be careful when trying to shotgun them in the belly up close; these guys flail their arms around after exposing their bellies for about 3 seconds. On an extra note, they are also the only bosses in the Mercenaries that don't blow up when dead.
Best method, however, I think, is to plant a landmine. All it takes is for them to land on it once + a single bullet of any kind at its belly to kill it. This method works best for weaker or incomptaible characters like BSAA Chris & Sheva & Jill.
Giant Majini (Stage 3 & 4 - Village & Ancient Ruins)
Attacks:
Forward leap: This is typically the first move he does when he appears. What he does is that he'd leap forward and whack his club straight down, and then he'd swing it 360 degrees around twice before he has to recover. It's easy to avoid since he announces it very clearly and you have a couple of seconds to get away. Instead of backing away or turning around and running, I recommend just running past him by his side. Be careful not to touch him even slightly though, the game considers it a hit.
Kick:
He usually does this when you're grabbed by an enemy from the back, or when you stand right in his face. (I find myself getting kicked each time I run up to him trying to do a melee attack but the prompt disappears just as I get to him) There's no real way to avoid this cos' he does this only when you're within such a close range that you can't exactly escape, unless you happen to struggle our of an enemy's grab as he kicks you, or pick up a nearby item. (Both situation grants you some invincibility)
Club swing:
He seldom does this. The only time I remember him doing it is when you get grabbed by an enemy from the back. It's like a kick substitute based on his mood or something, except it hurts more.
Helpful tactics:
This dude has the least HP next to the Reaper and is easily stunned, hence making him the easiest boss in the Mercenaries by my opinion. His weak spots are his legs and back, but of course it's easier to aim at his legs since he's mostly facing toward you.
For characters with a shotgun, the fastest/safest way to deal with him is to stick him in between a wall/corner and keep spamming shotgun > melee > shotgun > melee until he dies. Those with magnum can simply shoot at his crotch (LOL) since chances of missing his legs are higher, while those with machine guns can shoot wherever they find easiest to shoot at. (In my opinion his thighs/hips may be the easiest.)
On duo mode, you can perform a full 3-hit melee combo on these guys, which should kill them real fast. Also note that they (along with the Reapers, Lickers and Gatling gun majini ) do not get affected by flash grenades.
Licker (Stage 5 - Experimental Facility)
Attacks:
Tongue stab:
For a "tiny" boss (or sub-boss), this attack hurts like ****! Even with your best struggle you are likely to lose 2/3 of your life against this, so be sure to always keep your health at least 2/3 full. You can avoid it by side stepping early or running off in a different direction, but it's best practice that you stay out of their direct (straight) line of attack.
Tongue choke:
Their tongue stab automatically turns into a tongue choke if they get you from the back. Luckily, this one hurts a lot less.
Jump attack #1:
Their most common attack; they tend to do this once within 6 feet or so and could really mess up your aim as they force you to aim downwards at your feet where they would be/land after you get hit. There's no real way to avoid this other than to keep your distance or to run off in a different direction early before they jump.
Uppercut:
Their 2nd most common attack; they do this when they're very close to you. They may also be quick to do this immediately after jumping.
Jump attack #2 (instant death):
This happens when you see the prompt to press []X for a melee counter attack. Failing to do so results in an instant death when playing solo. But since it's really hard to react to that prompt in time, I recommend just running off in a different direction. But wait, there's an even easier and safer way if you're lucky - pick up an item near you =D. On duo mode, you can get your partner to save you.
Helpful tactics:
The Lickers only prove to be a real threat when a horde of them get too close to you. Thanks to their low HP, most characters can kill them off quickly with a single shot of the magnum, bow, hydra shotgun or rifle (the rifle may take 2 shots). Explosive, acid and nitrogen rounds work well on them as well, but the nitrogen rounds don't allow for melee attacks so you'll have to crush them yourself with a bow for tribal Sheva or machine gun for STARS Chris. This also means that you cannot earn the +5 sec bonus by killing them this way.
For characters like BSAA & Safari Chris whose strongest weapon is the shotgun, Lickers could be a little problem. They are hard to stun with a shotgun from a distance and letting them get too close is risky. The shotgun may take only 1 hit to kill a licker at point blank, but I personally recommend switching to their handguns and killing from a distance unless you're already surrounded. Of course, that means that you may have to stock up on handgun ammo in the beginning to prepare for the Lickers that come later.
Keep moving when dealing with a bunch of lickers to avoid getting tongue stabbed, choked or instant-killed by surprise.
Gatling Gun Majini (Stage 6 - Missile Area)
Attacks:
Gatling gun fire:
This dude can start firing from waaaay across the stage as long as he can see you, and this gets super annoying. His gatling gun fire will also knock you down if you get hit more than twice so it's best to either hide behind some cover, or try your best to stun him first with a magnum or hand grenade. Note that sometimes it takes more than a single hand grenade to stun him.
Barrel swing:
He does this if you're too close to him. It's pretty much unavoidable unless you can manage to hit him with a magnum (already equipped) first, which would require a lot of luck in such a scenario.
Helpful tactics:
Hide around a corner or behind a wall when you hear him shooting. A magnum would typically stun him in a single shot while a shotgun (at point blank) while rifle would take 2~3 shots. If aimed at the head, it only takes a single rifle shot to stun him, or a few seconds of continuous handgun/machine gun fire. If there are many enemies around, a hand grenade or two may be a better choice. Once he's stunned, keep firing at close range (except for magnum users) and perform the melee attack only when he's about to recover (note that he recovers pretty fast). Rinse and repeat. Please note that he recovers from the melee attack as fast as you do, so be sure to turn back and run away immediately if he hasn't died to avoid getting hit by his barrel swing.
These dudes seem to have a lot of HP due to the number of strong shots it requires to take them down, but that's only because all weapons other than the grenade launcher inflict 70-75% less damage, or so the guide says. Since only Tribal Sheva and STARS Chris have a grenade launcher, be sure to make good use of it and spam explosive rounds at them. Important note, however, explosive rounds may not necessarily stun them.
Chainsaw Majini (Stage 7 - Ship Deck)
Attacks:
Chainsaw cut: Obviously, he does this only when he's right in your face. However, unlike in RE4, the chainsaw dudes in RE5 don't attack immediately once in range; they stand and scream for about a second before they swing the chainsaw at you, so in that time you can always run past them to the left (harder to go right cause that’s where he holds the chainsaw). Thanks to this pause, there is really no reason for you to die against him unless you got screwed by nearby enemies. However, if you do get hit by this move when you’re grabbed from behind by another, you enter dying mode instead of instant death.
Chainsaw swing (berserk):
In the Mercenaries, only the blue pants ones will do this after they 'revive' (a.k.a berserk mode). They move fast and have pretty good reach, so you must deal with them from a distance. In this berserk mode, they won’t stop swinging until they die (they have roughly 2000 HP left) but they can still be stunned instantly using hand/flame/flash grenades.
Helpful tactics:
First off, there’re three rocket launchers laid around the stage free for grabs so you can always use those to kill off two at a time for those that come in pairs. (All three are located at the two highest points of the area) The catch is, you can only pick up one rocket launcher at a time, and you may accidentally blow yourself along with them.
If you’re not using the rocket launcher, the next safest gun would be the shotgun (other than the magnum of course). Personally, I fight them up close and personal, especially when it’s just one of them. Shotguns stun them in about 2 shots at point blank and it’s easy to do so thanks to the pause before their attack (as long as you don’t get hit by other enemies while you’re at it). So basically you can just blast shotgun bullets in their face at close proximity until they die.
For characters without a magnum or shotgun, you may need to buy some time through the use of hand/flash grenades or it will be hard to get a clear and undisturbed opportunity to deal with the chainsaws. This works real well for characters who’re already equipped with flash grenades like Tribal Sheva and Jill. For those who don’t start with it, there’re 2 flash grenades for grabs at one of the starting points (at the back of the ship). Be sure to also pick up any that enemies may drop, as well as hand grenades. One last method to quickly stun them is to keep spraying bullets in their faces. This works well for characters with machine guns.
Red Executioner (Stage 8 - Prison)
These guys are basically the same as the Executioners in the Public Assembly (stage 1), except they wear bondage gear, have 2~3 times more HP, moves faster and are more resistant to attacks, which makes it harder and riskier to stun them. Luckily, a rocket launcher still offs them instantly while hand/flame/flash grenades stun him. Handy little things aren’t they? One extra difference is that they have a fleshy weak spot on their back, although their heads have just about the same effect. As for the regular Executioners on this stage, note that even though they are "regular" they actually have twice (or so) the HP of an Executioner in the Public Assembly (stage 1) and will require more shots to kill than usual.
3th July 2009, Tuesday
Resident Evil 5: The Mercenaries (Part 3)
This post is revised on 28 July 2009. Highest scores are updated on 29 August 2009.
I've been officially heavily addicted to The Mercenaries since bout 10 days ago when for the first time in my life I was able to play it on co-op (duo mode) online cos' my brother finally allowed me to wire my PS3 up directly to the router across our rooms. I know I posted entries about RE5 Mercenaries before, but my addiction wasn't this bad then. >_o; So finally, it's time to repeat what I did before for RE4... only on RE5. Mwahaha~ Introducing.........
BSAA Chris
Weapons
Power
Note
Handgun
Weak
Support
Shotgun
Alright
Main
Grenades x5
Strong
Handy
How often I use him:
How confident I'm with him:
Most compatible stage(s): 1, 3, 4
Least compatible stage(s): 8
Highest score on any stage (solo): 113 190 (Stage4)
Highest score on any stage (duo): 534 078 (Stage1)
Example run (on duo): Stage 7 [Partner: BSAA Sheva] Comments:
My first opinion of him was - he's just like Leon in RE4, except better cos' he's got hand grenades! =D In the beginning I wasn't very fond of him, especially his weak handgun. But 100 hours of Mercenaries later, I finally realized he's actually very fun. It's true his handgun is weak (takes 4 shots to kill a regular majini), but it is perfect for setting up melee attacks. However, 1 face shot + straight is not enough to kill an enemy so it's best to go for a 1) knee shot + neck breaker or 2) chest shot + knee shot + uppercut. The only risk when going for neck breaker is getting hit by other enemies while trying to run past the stunned enemy, which can be very annoying so I suggest using his shotgun the moment there are more than 3 enemies nearby. It kills most enemies in 1~2 shots but it'll take some time to kill the bosses (which typically breaks my kill combo) .When dealing with bosses, I recommend throwing a grenade, then wait for him to get stunned, run over and shotgun him in the face 2~3 times + melee. Rinse and repeat.
Safari Chris
Weapons
Power
Note
Handgun
Normal
Support
Shotgun
Normal
Main
Rocket x2
Super
Awesome
How often I use him:
How confident I'm with him:
Most compatible stage(s): 1, 2, 6, 7, 8
Least compatible stage(s): 5
Highest score on any stage (solo): 114 410 (Stage4)
Highest score on any stage (duo): 477 671 (Stage6)
Example run (on duo): Stage 8 [Partner: Safari Chris] Comments:
Safari Chris is a walking tank next to STARS Wesker. He's got a pretty good handgun that kills most regular enemies in 3 shots, a pretty good shotgun for crowd control, and 2 bloody rocket launchers that wipe out ALL types of bosses instantly. (Of course, the rockets may also kill yourself if the explosion is too close) You can also conveniently spam melee moves (for +5 sec) as with Midnight Wesker even though Chris' punch (Straight) is only half as strong. Thanks to all this power he's perfect for pretty much every stage except for the Experimental Facility (Stage5) where there's no boss and enemies come way too close to you in narrow places for you to safely use the rockets. Besides, there's no real need/reason to use the rocket in that stage other than to quickly kill off the duvalias (a.k.a. crab/clam heads).
STARS Chris
Weapons
Power
Note
Machine Gun
Alright
Main
Grenade launcher
---
Screwy
Magnum
Strong
Useful
How often I use him:
How confident I'm with him:
Most compatible stage(s): All
Least compatible stage(s): ---
Highest score on any stage (solo): 123 850 (Stage4)
Highest score on any stage (duo): 354 132 (Stage3)
Example run (on solo): Stage 4 Comments:
Probably the most power-balanced Chris of the three (hence the reason I think he's compatible with all 8 stages, although his most conveniently compatible stage may be stage2 a.k.a. the mines). His machine gun is fairly good to set up melee attacks and some crowd control, his magnum for bosses and grenade launcher for nitrogen and flash rounds. Unfortunately he starts out with electric rounds for his grenade launcher, which often does you more bad than good (except against the Reapers), so it probably won't prove too useful until you pick up other rounds from fallen enemies.
BSAA Sheva
Weapons
Power
Note
Handgun
Weak
Support
Machine Gun
Weak
Main
Sniper Rifle
Normal
Handy
How often I use her:
How confident I'm with her:
Most compatible stage(s): 1, 2, 3, 4
Least compatible stage(s): 8
Highest score on any stage (solo): 103 840 (Stage7)
Highest score on any stage (duo): 409 263 (Stage6)
Example run (on duo): --- Comments:
Like BSAA Chris, her handgun is good for setting up melees but cos' it's weak the only quick way to kill an enemy with a melee is to shoot them in the knee + throat slit, which involves the same risk as I mentioned for BSAA Chris. Unfortunately, Sheva does not have the shotgun for crowd control so when surrounded, I think it's best to get some distance away and switch to the machine gun or sniper rifle. The rifle is great for shooting at far away enemies to keep your combo, but she does not come with reserve ammo so be sure to pick them up whenever you can. Sheva's biggest problem would be her slight lack of firepower. Her machine gun takes a lot of time to damage/stun a boss while her rifle creates many unwanted blind spots for enemies to interrupt/grab you. To play safe, it would be perfect to pick up flash grenades and use them to buy yourself a few seconds of peace while firing at the boss with the rifle.
Clubbin' Sheva
Weapons
Power
Note
Machine Gun
Normal
Support
Shotgun
Normal
Main
Sniper Rifle
Strong
Risky
How often I use her:
How confident I'm with her:
Most compatible stage(s): 1, 2
Least compatible stage(s):
Highest score on any stage (solo): 105 200 (Stage6)
Highest score on any stage (duo): 391 000+ (Stage6)
Example run (on solo): Stage 8 Comments:
Clubbin' Sheva is actually powerfully balanced (but not broken), but she is likely to discourage players with her choice of sniper rifle due to its slow firing speed, unless you're playing the game on the PC. Otherwise, if the firing speed bothers you, you can always stick to her two other guns and forget about using the sniper rifle unless convenient. Better yet, you can always discard it so that enemies stop dropping rifle ammo. Her machine gun is good against bosses who don't easily get stunned while her shotgun is good for those otherwise (e.g. chainsaw majini), but either way she's still likely to take some time to take bosses down.
Tribal Sheva
Weapons
Power
Note
Long Bow
Strong
Main
Grenade Launcher
---
Support
Incendiary x3
Weak
Screwy
Flash x3
---
Handy
How often I use her:
How confident I'm with her:
Most compatible stage(s): 1, 3, 4, 5
Least compatible stage(s): ---
Highest score on any stage (solo): 154 045 (Stage1)
Highest score on any stage (duo): 468 231 (Stage7)
Example run (on duo): Stage 5 [Partner: Tribal Sheva] Comments:
My favorite of the ten (on the PS3). Her primitive bow may not have laser sight but it sure is one hell of a killing machine; it kills all regular enemies in 1 shot and sub-bosses in 3 shots. It's also got infinite ammos so I don't ever have to worry about picking up extras. She can't set up melee attacks like the other characters with her main weapon but she's got the super handy grenade launcher, pre-loaded with awesome nitrogen rounds, which is perfect for crowd control and earning bonus time (+5 sec). Her flame grenades aren't too useful (other than to kill chickens or stun chainsaw bosses) but her flash grenades are handy. So yeah, there's simply nothing to dislike about her, 'cept for maybe her firing speed, but that's a low price to pay for such epic pwnage! Well okay she takes between 5 to 15 shots to kill a boss (depending on which boss it is) and that consumes time BUT, she can easily keep the kill combo up by conveniently killing a regular enemy beside the boss before shooting back at him (or simply use the grenade launcher). Awesomesauce.
BSAA Jill
Weapons
Power
Note
Handgun
Normal
Main
Machine Gun
Normal
Support
Flash x5
---
Handy
How often I use her:
How confident I'm with her:
Most compatible stage(s): 2
Least compatible stage(s): 6, 8
Highest score on any stage (solo): 123 240 (Stage4)
Highest score on any stage (duo): 424 443 (Stage1)
Example run (on duo): Stage 7 [Partner: BSAA Jill] Comments:
I didn't like using her much before, but I've now grown a liking to her. She's got a good handgun (with a headshot probability of 80%) and an alright machine gun (which has penetration effect), both of which are perfect for setting up melees. Her 5 flash grenades are also very handy to start off with in case of mutated enemies, especially in stages 4 and 5 (ruins & experimental facility). Sadly, her biggest weakness would be her lack of firepower. Both her guns are considerably weak against bosses and are more than likely to cause a break in your kill combo while you try kill off a boss, but you can always use the flash grenades to buy yourself some peace during critical times. If you ask me this Jill makes a fair challenge and would prove you to be a strong player if you can kick major ass with her.
Battle Suit Jill
Weapons
Power
Note
Machine Gun
Weak
Main
Sniper Rifle
Normal
Support
Grenades x3
Strong
Handy
How often I use her:
How confident I'm with her:
Most compatible stage(s): 2
Least compatible stage(s): 6, 8
Highest score on any stage (solo): 119 920 (Stage7)
Highest score on any stage (duo): 436 870 (Stage6)
Example run (on duo): Stage 1 [Partner: Battle Suit Jill] Comments:
Her machine gun (though weak) has 300 capacity and she comes equipped with a shitload of ammo - sweet. She does not require superb head shot aiming skills to set up melee attacks cos' all she needs is to spray half a second of bullets at an enemy's legs so that they fall over, and then simply perform her double knee drop melee attack. However, she may be a little bit of a trouble when it comes to the bosses. She takes a long time to stun bosses with her machine gun while her shiper rifle would create blind spots and leave you vulnerable to enemies coming from behind. To play safe, I find myself constantly running around and switching locations while trying to shoot at the boss and other enemies at the same time. Her hand grenades help, but in the end she's only got three.
Midnight Wesker
Weapons
Power
Note
Handgun
Normal
Main
Magnum
V. Strong
Support
Grenades x5
Strong
Handy
Landmines x5
Strong
Handy
How often I use him:
How confident I'm with him:
Most compatible stage(s): 1, 3, 4, 6, 7, 8
Least compatible stage(s): 2, 5
Highest score on any stage (solo): 145 400 (Stage4)
Highest score on any stage (duo): 487 682 (Stage1)
Example run (on duo): Stage 3 [Partner: Midnight Wesker] Comments:
This man's a hi-scorer's best friend. Most of those who aim for high scores would pretty much just spam him and his Cobra Strike (damn Capcom for taking out Chikyo Chagi. Windfall doesn't count). His handgun has penetration effect, his ultra magnum rapes bosses in a few seconds (or just one) and his 5 hand grenades and landmines are handy for crowd control when he ever needs it. Better yet, Wesker has one unique ability that only he has, which is to run across a long straight distance in about 2 seconds, and that is super convenient for players to quickly travel over certain areas. It's almost clear he's broken... except for some reason I just can't seem to do very well with him. The ironic part about him, to me, is that even though his magnum is cheap, my accuracy with that thing is like 20%. Something about it simply rips me off my accuracy and I don't know why. An enemy could be right in my face and I would still miss him, and then I'd die getting stabbed and whacked 5 times in a row. GRRRR *Snarrrl* GGRRRRR!!!
STARS Wesker
Weapons
Power
Note
Handgun
Strong
Support
Shotgun
V. Strong
Main
Magnum
Strong
Support
How often I use him:
How confident I'm with him:
Most compatible stage(s): All
Least compatible stage(s): ---
Highest score on any stage (solo): 125 920 (Stage6)
Highest score on any stage (duo): 378 947 (Stage4)
Example run (on duo): Stage 6 [Partner: Midnight Wesker] Comments:
If Safari Chris is a walking tank, STARS Wesker is a flying B-2 bomber. He might as well wear stealth camoflouge and shoot infinite nuclear missiles. Basically, he can do everything Midnight Wesker can, with the addition of being a god at crowd control thanks to his Hydra shotgun, which takes only 3 shots at point blank to kill an executioner. (1 shot in the belly for Reapers, 2 shots for Giant Maijinis, etc) If you're a Mercenaries beginner, this man is most likely the safest to start with, although I doubt you'd ever want to switch to anyone else after that. (However... note that he is the last person you unlock XD) The only reason why Midnight Wesker is the more popular choice for high scores is because of his weaker handgun, which more easily allows you to set up melee attacks than STARS Wesker's super handgun that kills too fast. High scorers would also refuse to waste enemies with his powerful shotgun since they can't get their oh-so-very-important +5 seconds per melee kill. But if you ask me, STARS Wesker's still the awesomost, cos' no one holds the shotgun hawter than him!!! *_*! KyaaAAaa!!